Those who have read my reviews are well aware that I'm a bit of an audiophile and serious music junkie. With COVID-19 mandating that I work from home, I finally decided to get serious about my audio setup in the office so I could enjoy listening while working. After all, I spend 40-50 hours a week in this room, and much of it is spent in silence, with nothing but the clacking of my keyboard to keep me company.
My wife graciously allowed me to take over an upstairs bedroom as my office, and as a result I had a nice 15x15 room to work with. With my desk on the opposite side of the room from where the speakers would go, I determined that I would need a solution to stream music directly to this setup without any wires running across the room from my work PC.
2 Channel 101 - What Do I Need?
Any 2 channel system needs at least 3 components:
Sources & Streaming Endpoints
While many people play back their audio content directly from their PC, more and more folks are moving towards endpoint streaming using Airplay, DLNA or other more focused solutions. As an avid audiophile, I already owned a license of Roon, which is a fantastic solution for managing and streaming your music library. Roon also integrates with Tidal, allowing me to add a vast library of streaming lossless content to my collection. With my goal of no long wires in mind, I decided to go with a Roon endpoint and DAC to feed my setup.
To stream music, Roon requires a device that is "Roon Ready". There are a plethora of products that can do this already, including the Oppo UDP-XXX series, which I use in my living room. Luckily, one doesn't have to buy an overpriced HiFi accessory to do this, as it can be accomplished with a Raspberry Pi and a free platform called Ropieee. I had a Raspberry Pi 3 lying around already, which I repurposed and installed Ropiee on according to this very helpful guide.
Finalizing The System
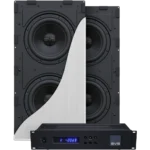
I already had a pair of XTZ 99.26 MKII speakers on hand that I reviewed here on HTF 6 years ago, and a beefy 2 channel D-Sonic amplifier, the M3a-3000S, so all I needed was a DAC and (since I love my bass) a subwoofer.
Choosing a DAC is really about how much nervosa you have when it comes to audio quality. Most DACs measure well enough that the differences between them are inaudible, so I generally focus on a DAC that measures well in addition to having the connectivity and features I need. In this case, I really needed a DAC with built-in volume control since I didn't want to add another component to my system. I decided to give the newest D90 DAC from Chinese manufacturer Topping a try, as it measures extremely well and has built in volume control in addition to a remote.
From a subwoofer perspective I wanted something that was both reasonably sized and would perform well for music. This narrowed my choice down to sealed subwoofers, so I called up our forum sponsor SVS, and ordered a pair of SB-3000 subwoofers in piano black to match the XTZ speakers.
Putting It All Together
Once the components had all arrived, I proceeded to place my speakers approximately 11 feet apart, and 2 feet off the back wall, with the subwoofers next to each of the speakers. The Raspberry Pi was plugged into a network cable, and I ran a USB cable from the RaspberryPi RoPieee box into the Topping D90. I ran RCA interconnects from the D90 into the input on each SB-3000, and then from each sub’s output another cable to the D-Sonic M3a-3000S amplifier. This put the subs directly in-line with the speaker signal, allowing me to dial them in.
Calibrating
Roon has many powerful features, one of which is a full DSP engine. This allows correction filters to be run directly on the output device enabling phenomenal room correction as long as you have a microphone like the MiniDSP UMIK-1 and the free Room EQ Wizard software. There’s a fantastic guide on the Roon forums here, if you’re interested.
I plugged my UMIK-1 into my laptop and proceeded to take measurements for both the left and right channels using a 15-10,000Hz sweep. The results were pretty darn good for a non-equalized system, but still had room for improvement.

Within REW, you can generate filters from the EQ window, so I set up my target settings and clicked the “Match response to target” text.

This generates a series of filters that can be used in Roon:

Time To Listen
I loaded up Roon and added my custom filters into the DSP engine under Convolution (just point to a zip file containing the filters REW exports) for my upstairs device settings.

Once this was done, it was finally time to listen! The system sounds really amazing - and i'm very happy with the results.

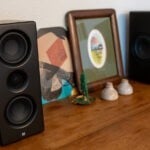
Here's a picture of the system all hooked up:

My wife graciously allowed me to take over an upstairs bedroom as my office, and as a result I had a nice 15x15 room to work with. With my desk on the opposite side of the room from where the speakers would go, I determined that I would need a solution to stream music directly to this setup without any wires running across the room from my work PC.
2 Channel 101 - What Do I Need?
Any 2 channel system needs at least 3 components:
- Speakers or Headphones
- An amplifier with volume control
- A source - typically a CD player, PC or streaming device
Sources & Streaming Endpoints
While many people play back their audio content directly from their PC, more and more folks are moving towards endpoint streaming using Airplay, DLNA or other more focused solutions. As an avid audiophile, I already owned a license of Roon, which is a fantastic solution for managing and streaming your music library. Roon also integrates with Tidal, allowing me to add a vast library of streaming lossless content to my collection. With my goal of no long wires in mind, I decided to go with a Roon endpoint and DAC to feed my setup.
To stream music, Roon requires a device that is "Roon Ready". There are a plethora of products that can do this already, including the Oppo UDP-XXX series, which I use in my living room. Luckily, one doesn't have to buy an overpriced HiFi accessory to do this, as it can be accomplished with a Raspberry Pi and a free platform called Ropieee. I had a Raspberry Pi 3 lying around already, which I repurposed and installed Ropiee on according to this very helpful guide.
Finalizing The System
I already had a pair of XTZ 99.26 MKII speakers on hand that I reviewed here on HTF 6 years ago, and a beefy 2 channel D-Sonic amplifier, the M3a-3000S, so all I needed was a DAC and (since I love my bass) a subwoofer.
Choosing a DAC is really about how much nervosa you have when it comes to audio quality. Most DACs measure well enough that the differences between them are inaudible, so I generally focus on a DAC that measures well in addition to having the connectivity and features I need. In this case, I really needed a DAC with built-in volume control since I didn't want to add another component to my system. I decided to give the newest D90 DAC from Chinese manufacturer Topping a try, as it measures extremely well and has built in volume control in addition to a remote.
From a subwoofer perspective I wanted something that was both reasonably sized and would perform well for music. This narrowed my choice down to sealed subwoofers, so I called up our forum sponsor SVS, and ordered a pair of SB-3000 subwoofers in piano black to match the XTZ speakers.
Putting It All Together
Once the components had all arrived, I proceeded to place my speakers approximately 11 feet apart, and 2 feet off the back wall, with the subwoofers next to each of the speakers. The Raspberry Pi was plugged into a network cable, and I ran a USB cable from the RaspberryPi RoPieee box into the Topping D90. I ran RCA interconnects from the D90 into the input on each SB-3000, and then from each sub’s output another cable to the D-Sonic M3a-3000S amplifier. This put the subs directly in-line with the speaker signal, allowing me to dial them in.
Calibrating
Roon has many powerful features, one of which is a full DSP engine. This allows correction filters to be run directly on the output device enabling phenomenal room correction as long as you have a microphone like the MiniDSP UMIK-1 and the free Room EQ Wizard software. There’s a fantastic guide on the Roon forums here, if you’re interested.
I plugged my UMIK-1 into my laptop and proceeded to take measurements for both the left and right channels using a 15-10,000Hz sweep. The results were pretty darn good for a non-equalized system, but still had room for improvement.
Within REW, you can generate filters from the EQ window, so I set up my target settings and clicked the “Match response to target” text.
This generates a series of filters that can be used in Roon:
Time To Listen
I loaded up Roon and added my custom filters into the DSP engine under Convolution (just point to a zip file containing the filters REW exports) for my upstairs device settings.
Once this was done, it was finally time to listen! The system sounds really amazing - and i'm very happy with the results.
Here's a picture of the system all hooked up: