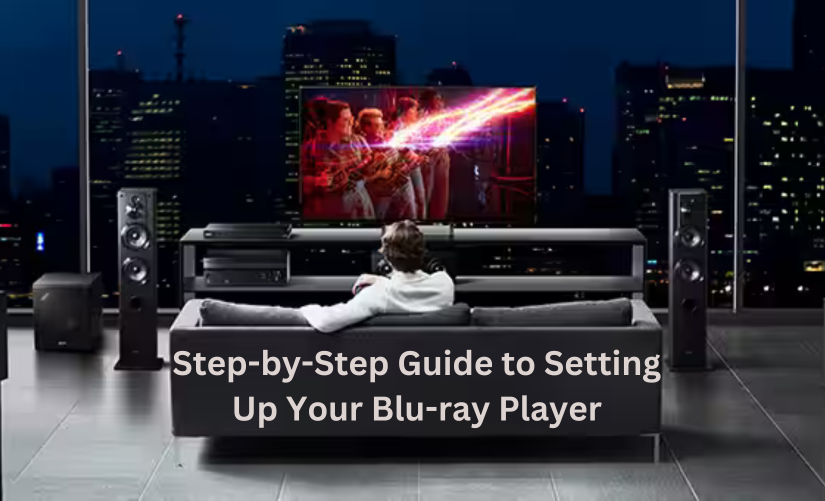
The allure of Blu-ray for home theater aficionados remains undiminished thanks to its unparalleled picture and sound quality.
But before you can experience the full force of the Blu-ray experience, you’ll need to set up your Blu-ray player correctly and tweak its settings for your particular configuration.
Only then will you extract every ounce of performance from your home entertainment system.
This guide aims to walk you through each step of setting up your Blu-ray player, ensuring you achieve the best possible audio and video quality.
Table of Contents
Unboxing and Initial Setup
The excitement of bringing home a new Blu-ray player is undeniable, but before you can immerse yourself in the world of high-definition entertainment, there’s one crucial step to tackle: unboxing and setup.
- Prepare Your Space: Before opening the box, clear a clean, flat surface where you can safely unpack your Blu-ray player. This will give you ample room to organize the components and ensure nothing gets misplaced or damaged in the process.
- Carefully Open the Box: Using a box cutter or scissors, carefully cut the tape and open the box. Be mindful not to cut too deep, as you don’t want to accidentally damage the contents inside!
- Check the Contents: Verify that all expected components are present. This typically includes the Blu-ray player, remote control, batteries for the remote, power cord, HDMI cable (if included), user manual, and warranty information.
- Choose the Right Location: Select a stable, level surface with adequate ventilation for your Blu-ray player installation. To prevent overheating, avoid enclosed spaces or stacking them under other electronic devices.
- Connect to Power: Plug the power cord into your Blu-ray player and then into an electrical outlet. If using a power strip, choose one with surge protection to safeguard your device from voltage spikes.
- Connect to Your TV: Use an HDMI cable to connect your Blu-ray player to your television. This ensures the best possible video and audio quality. If your TV doesn’t have HDMI ports, consult the user manual for alternative connection methods, such as component or composite cables. More on this shortly.
- Insert Batteries into the Remote: Place the provided batteries into the remote control, paying attention to the correct polarity (+ and -) as indicated inside the battery compartment.
- Power On and Set Up: Turn on your Blu-ray player and TV. Follow the on-screen prompts to complete the initial setup, which may include language selection, network configuration (for smart Blu-ray players), and software updates.
By following these steps, you’ll be well on your way to enjoying the immersive experience of your new Blu-ray player.
Before moving on, take a moment to familiarize yourself with the remote control and the player’s features.
And one more thing to mention: When we discuss settings, beware that the names and labels often vary from manufacturer to manufacturer. For example, refresh frame/frame rate, color space/color gamut, and upscaling/upconverting, to name but a few.
Make sure to have the manual by your side when following this guide, as it should tell you precisely what each setting means.
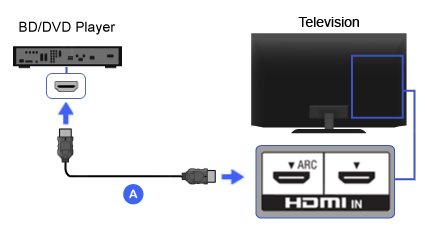

Connecting to Your TV: The Foundation of Your Home Theater
The heart of any home theater system lies in the connection between your Blu-ray player and your television.
The quality of this connection directly impacts your setup’s video and audio performance, dictating the level of detail, color accuracy, and sound fidelity you’ll experience.
HDMI (High-Definition Multimedia Interface)
Connecting Blu-ray to TVs usually involves HDMI cables, the preferred choice for most modern home theater setups.
They can carry both high-resolution video and multi-channel audio signals through a single cable, simplifying the connection process and minimizing cable clutter.
HDMI cables are designed to handle the bandwidth requirements of 4K and HDR content, ensuring optimal picture and sound quality.
Component Video
For older TVs that don’t have HDMI ports, component video cables are the next best option for video quality. These cables split the video signal into three separate channels (red, green, and blue) to provide a high-quality picture, although not quite as good as HDMI.
However, component cables don’t carry audio signals, so you’ll need to use a separate cable for sound. You can use a digital optical or coaxial audio cable to connect your Blu-ray player to your audio system while using HDMI or component cables to connect the player to your TV for video.
Audio Setup: Crafting Your Soundstage
Setting up Blu-ray players isn’t just about visuals – it’s also about immersing yourself in the audio landscape of your favorite films.
Crafting the perfect soundstage involves connecting your Blu-ray player to a suitable audio system and fine-tuning the settings to create a controlled but rich and engaging listening environment.
Connecting to a Sound System
When connecting a Blu-ray player to your sound system, you have several options depending on your equipment and desired audio experience:
- HDMI (ARC): If both your TV and sound system support HDMI ARC (Audio Return Channel), you can connect a Blu-ray player to your TV via HDMI and then use a single HDMI cable between your TV and sound system. The TV will send the audio from the Blu-ray player to your sound system via the ARC connection.
- HDMI (Directly to Sound System): Connect your Blu-ray player directly to your AV receiver or soundbar using an HDMI cable. This allows your sound system to handle the audio decoding, providing access to high-quality audio formats like Dolby TrueHD, Dolby Atmos, and DTS-HD Master Audio.
- Optical/Coaxial Digital: If your sound system doesn’t have HDMI inputs, you can use an optical (TOSLINK) or coaxial digital audio cable to send audio from your Blu-ray player to your sound system. These connections support many surround sound formats, but not the high-resolution formats like Dolby TrueHD and DTS-HD Master Audio. Read more about Optical Connections.
- Analog Stereo: For basic stereo setups, you can connect your Blu-ray player to your TV or sound system using analog RCA cables (usually red and white connectors). This is the simplest but lowest-quality option.
Audio Output Settings
Once you’ve connected the Blu-ray player to your sound system, you’ll need to configure the audio output settings for optimal performance:
- Audio Format (Bitstream vs. PCM): If your sound system supports high-resolution audio formats, set your Blu-ray player to output “Bitstream” audio. This sends the encoded audio directly to your sound system for decoding. If your sound system doesn’t support these formats, or if you’re encountering audio sync issues, set the player to output “PCM” audio instead. PCM audio is decoded by the Blu-ray player and sent as an uncompressed signal to your sound system. Keep in mind that PCM maxes out at 7.1 channels, so it can’t carry immersive audio signals like Dolby Atmos or DTS:X.
Read more about Bitstream Vs PCM
- Dynamic Range Compression (DRC): This reduces the volume difference between loud and quiet sounds. It can be helpful for late-night viewing or when loud noises are overwhelming versus softer noises like dialogue.
- Downsampling: If your sound system doesn’t support high-resolution audio formats, you may need to enable downsampling on your Blu-ray player. This converts high-resolution audio to a lower-resolution format that your system can process.
- Secondary Audio: Blu-ray discs can include secondary audio tracks for features like directors’ commentaries. Enabling secondary audio can force the player to use a lower-quality audio format. If you’re not using these features, disable secondary audio to experience the best sound quality.
Remember, the exact settings and options available will vary depending on your specific Blu-ray player and sound system. Consult your equipment manuals for detailed instructions.
Feel free to experiment with different settings to find the configuration that provides the best audio experience for your setup. If you do something wrong and can’t seem to backtrack, perform a soft reset to go back to square one. This might be called ‘restore to default settings’ or similar depending on the manufacturer.
Video Settings For Optimal Picture Quality
All connected so far?
Let’s dive deeper into some optimal Blu-ray settings, from adjusting resolution and aspect ratio to HDR and color depth. Optimizing your video output will make a remarkable difference in how you experience your favorite media.

Aspect Ratio
When you dive into your Blu-ray player’s settings, the aspect ratio option controls how the content fits onto your screen. Here’s what you need to know:
- Full vs. Normal: The ‘Full’ setting stretches the image to cover the entire screen, which can distort movies shot in a traditional cinema aspect ratio, like 1.37:1, causing them to look unnaturally wide. On the other hand, ‘Normal’ maintains the content’s original aspect ratio, displaying black bars on the sides (or top and bottom) to fill in the extra space without altering the intended view. This setting keeps the cinematic integrity intact.
- Squeeze Option: Some Blu-ray players offer a ‘squeeze’ feature, which is particularly useful for those using anamorphic lenses in projector-based home theater Blu-ray setups. This option compresses the image horizontally to match the lens’s expansion, ensuring the picture looks correct on the screen without distortion.
Auto Resolution
There are two main types of Blu-ray discs:
Standard Blu-ray discs, which have a native resolution of 1080p (1920×1080 pixels).
Ultra HD Blu-ray discs, which have a native resolution of 4K (3840×2160 pixels).
If you have a 4K TV and you’re playing a standard 1080p Blu-ray disc, the image needs to be upscaled to fill the extra pixels on your 4K screen. In this case, you’ll need to decide whether to let your Blu-ray player or your TV handle the upscaling process.
Many Blu-ray players include an ‘Auto’ resolution function that automatically upscales the 1080p content to match your TV’s 4K resolution.
However, this might not always provide the best picture quality, as most modern 4K TVs have advanced upscaling technologies that may work better than the Blu-ray player.
To optimize your resolution settings:
- Navigate to your Blu-ray player’s settings menu and find the video output or resolution settings.
- Disable auto-upscaling on your Blu-ray player.
- Set the player’s output resolution to 1080p to send the native resolution of the disc to your TV.
- Let your 4K TV handle the upscaling process.
You’ll do the same in reverse to set the Blu-Ray player to handle upscaling. So, you’ll set the Blu-Ray player to upscale and the TV to ‘Auto.’
It’s always worth experimenting to determine whether the player or TV does a better job, or whether there’s no difference.
Frame Rate Settings for a Cinematic Experience
Frame rate influences how smooth or realistic motion appears on your screen. Films are traditionally shot at 24 frames per second (fps).
Blu-ray players might use terms like ‘native frame rate’ to describe settings that avoid adding motion smoothing or interpolation, preserving the film’s original quality.
Adjustable Subtitle Placement
For widescreen movies that feature black bars (2.35/2.40:1 aspect ratio), some Blu-ray players allow you to shift subtitles into the picture area, improving readability without disrupting the viewing experience.
Turning Off the Blu-Ray Display
If you’re using your Blu-ray player in a dedicated home theater room with controlled lighting, you might find that the bright LCD or LED display on the front of the player can be distracting.
Fortunately, most Blu-ray players can dim or completely disable this display. Some players even offer an “Auto” mode that will automatically dim the display after a certain period of inactivity and light it back up when you press a button on the remote.
Advanced Features: Elevating Your Viewing Experience
In addition to the above, here are some other advanced features worth exploring and experimenting with:
- Color Depth: Blu-ray discs support a color depth of 8, 10, or 12 bits per channel. Higher bit depths allow for more gradations of color, resulting in smoother color transitions and reduced color banding. If your TV supports it, setting your player to output at a higher bit depth can improve color quality.
- Chroma Subsampling: Chroma subsampling is a technique used to compress video data by reducing the resolution of the color information compared to the brightness information. The vast majority of Blu-ray discs, including both standard Blu-rays and 4K Ultra HD Blu-rays, use 4:2:0 chroma subsampling. However, some players allow you to upscale the disc’s native subsampling at 4:4:4 for the highest color accuracy, which can be particularly noticeable with text and fine details. It’s worth experimenting with if you have the option.
- Deep Color: Deep Color is a feature that allows for higher color bit depths over HDMI, typically 10-bit or 12-bit color. If your Blu-ray player and TV both support Deep Color, enabling this feature can provide smoother color gradations and reduced banding.
- High Dynamic Range (HDR): If you have an HDR-capable TV and an HDR-compatible Blu-ray player, ensure that HDR output is enabled in your player’s settings. HDR provides a wider range of brightness and color, producing more vivid and lifelike images. HDR10 is considered ‘basic’ or ‘static’ HDR, while HDR10+ and Dolby Vision are both ‘dynamic’ HDR. Most 4K Blu-ray players now handle dynamic HDR.
- 3D Playback: If both your Blu-ray player and TV support 3D playback, you can enable this feature to enjoy 3D movies at home. Ensure your player’s 3D output settings match your TV’s 3D capabilities (e.g., Side-by-Side or Top-and-Bottom format). Don’t forget that you’ll also need compatible 3D glasses.
Network Connectivity For Internet Access and Streaming
Connecting your Blu-ray player to your home network is a gateway to enhancing your viewing experience with a plethora of online features and content.
- Wired vs. Wireless: A wired Ethernet connection offers the most stable and reliable network performance, ensuring smooth streaming and efficient firmware updates. However, Wi-Fi is a convenient alternative if your setup or router placement makes a wired connection impractical.
- On-Screen Setup: Once connected, your Blu-ray player will typically guide you through the network setup process via on-screen prompts. This might include selecting your home network from a list and entering the password. Following the setup and checking for and installing any available firmware updates is a good idea.

Summing Up
Setting up Blu-ray players involves more than just plugging them in – but that’s all part of the fun.
You can often vastly improve your home theater experience by fine-tuning your audio and video settings, so feel free to get stuck in and experiment with different settings to discover what works best for your setup.
You can always do a soft reset if you change something and can’t remember how to change it back.
And remember, the HomeTheaterForum community is always here to help with advice and to share experiences.
Share your setup tips and engage with fellow home theater enthusiasts to get the most out of your Blu-ray player.
FAQS
How can I keep my Blu-ray discs clean?
Keeping your discs clean is essential for maintaining optimal playback quality. Use a soft, lint-free microfiber cloth to gently wipe the disc surface straight from the center to the outer edge.
This helps remove dust, fingerprints, and smudges that can cause skipping or freezing. Avoid using circular motions as they can spread debris across the disc, potentially causing more playback issues.
And here’s a tip: 4K UHD discs can be more susceptible to skipping, so be extra careful handling them!
How can I ensure my Blu-ray player is region-free, or how do I change its region?
Blu-ray players are typically locked to the region where they were sold. Still, some models, like those from Magnetar and Reavon, offer multi-region or region-free capabilities, either natively or through a modification.
To change the region or check if your player is region-free, consult the user manual or manufacturer’s website for specific instructions.
Sometimes, entering a code via the remote control can switch regions. However, be cautious, as altering your player’s region settings or firmware might void the warranty.
The player is not recognizing my Blu-ray disc. What should I do?
If your Blu-ray player fails to recognize a disc, first ensure the disc is clean and free of scratches or smudges. If the disc is in good condition, try resetting your Blu-ray player by unplugging it for a few minutes and then plugging it back in.
Also, check for and install any available firmware updates, as compatibility issues with newer discs may be resolved through software updates.
If the problem persists with multiple discs, a hardware issue with the player’s disc drive may require professional repair or replacement.
Additional Reading
Don’t forget to jump over to our Best 4K Blu-Ray Players article to find the right fit for you, regardless of your budget!

Sam Jeans is a freelance writer who has worked with prestigious clients such as the Royal Mint, The Independent, DailyAI, and top tech companies like Lenovo and Toshiba. With an MSc in International Development and Social Anthropology and a BA in Audio and Music Production, Sam brings a unique perspective to his writing, blending cultural knowledge with insights into audio engineering and the latest tech gadgets and trends.
Post Disclaimer
Some of our content may contain marketing links, which means we will receive a commission for purchases made via those links. In our editorial content, these affiliate links appear automatically, and our editorial teams are not influenced by our affiliate partnerships. We work with several providers (currently Skimlinks and Amazon) to manage our affiliate relationships. You can find out more about their services by visiting their sites.

One Response
I think this may be very helpful as a lot of instruction books (we’re guys we don’t use those)don’t translate all that well.