What's new

Show Off Your Pics (2 Viewers)

Citizen87645

Reviewer
Senior HTF Member
Joined
May 9, 2002
Messages
13,058
Real Name
Cameron Yee
That you're photographing pets makes it more challenging, because the usual advice is to find a different location (e.g. entirely shaded) or have the subject face a different direction (e.g. so their back is to the sun). In the last two, they are essentially backlit, so if you want the subject to be properly exposed, you're going to have to blow out the background even more (i.e. heavily overexpose it so it loses most of its detail).

The above assumes you don't want to use daylight fill flash, which is the other strategy, but it's pretty much a whole other thing (but definitely worth learning). The basic idea is that you can expose for the background, which underexposes your subject, but then use the flash to light the subject back to proper exposure.
 
Last edited:

kngdmond

Auditioning
Joined
Sep 16, 2017
Messages
4
Real Name
Matt
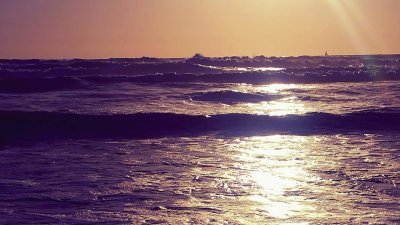
This is a photo I took on vacation while in San Diego.
 

Attachments

  • FB_IMG_1505624274449.jpg
    FB_IMG_1505624274449.jpg
    188.8 KB · Views: 52

Mike Frezon

Moderator
Premium
Senior HTF Member
Joined
Oct 9, 2001
Messages
60,773
Location
Rexford, NY
That you're photographing pets makes it more challenging, because the usual advice is to find a different location (e.g. entirely shaded) or have the subject face a different direction (e.g. so their back is to the sun). In the last two, they are essentially backlit, so if you want the subject to be properly exposed, you're going to have to blow out the background even more (i.e. heavily overexpose it so it loses most of its detail).

The above assumes you don't want to use daylight fill flash, which is the other strategy, but it's pretty much a whole other thing (but definitely worth learning). The basic idea is that you can expose for the background, which underexposes your subject, but then use the flash to light the subject back to proper exposure.

Thanks, Cameron.

All that makes sense to me. Many of the shots were safely ensconced in shade...making everything hunky-dory. But those shots where nearly everything looked good but there'd be a spotlight of sun shining on one of the dog's faces threw everything off.

Admittedly, I never even thought of fill flash when shooting the dogs with the hillscape behind them. I wasn't carrying my flash unit with me, but could have considered using the small pop-up flash on the camera itself (which I never use--and nearly always forget is even there).

It was a pretty view. Here's a shot with the background properly exposed and I didn't have to worry about lightening up anything in the shady foreground:

full
 

JohnRice

Bounded In a Nutshell
Premium
Ambassador
HW Reviewer
Senior HTF Member
Joined
Jun 20, 2000
Messages
18,935
Location
A Mile High
Real Name
John
I hope you guys don't mind, but I have a basic, elementary question.

As you can see from the images in my last post, I was sometimes challenged during this trip by a real mix of shade and bright sun. Sometimes it was a matter of bright sunshine breaking through the trees in a very shady wooded area. Other times it was a bright background (open landscape) located behind my subjects in a shady area.

What's the best way to handle that kind of situation?
It's amazing what can be accomplished with RAW and adjusting the highlight and shadow levels during conversion, and making sure you don't overexpose the shot. In the old film days, fill flash was about the only option, but these days I prefer to avoid that when I can. If you do that, use TTL and turn down the flash level. You can also consider carrying a collapsible reflector for fill. Depending on your camera, it can be amazing what can be extracted from shadows.
 

JohnRice

Bounded In a Nutshell
Premium
Ambassador
HW Reviewer
Senior HTF Member
Joined
Jun 20, 2000
Messages
18,935
Location
A Mile High
Real Name
John
The pop-up flash isn't likely to be powerful enough for daylight fill in most situations.
 

Mike Frezon

Moderator
Premium
Senior HTF Member
Joined
Oct 9, 2001
Messages
60,773
Location
Rexford, NY
So, basically John...you're saying to shoot for proper exposure of the background, leave the subjects dark and then just lighten the subjects in post-production?
 

JohnRice

Bounded In a Nutshell
Premium
Ambassador
HW Reviewer
Senior HTF Member
Joined
Jun 20, 2000
Messages
18,935
Location
A Mile High
Real Name
John
So, basically John...you're saying to shoot for proper exposure of the background, leave the subjects dark and then just lighten the subjects in post-production?
Maybe not quite to that degree. The background isn't the subject, and it's probably best if it stays a bit bright, since that's the situation. If you push it too far and not have the background at least a little bright, it can look artificial. Experiment with what can be done by bringing down the highlights and raising the shadows. It's kind of amazing what can be done, but it depends on the original file. There's always HDR too. It can be done gently.

Shoot the highest quality, largest bit depth file you have available.
 

Scott Merryfield

Senior HTF Member
Joined
Dec 16, 1998
Messages
18,892
Location
Mich. & S. Carolina
Real Name
Scott Merryfield
Mike,

Lot's of good advice has been offered so far. It really is a combination of moving your shooting angle for better light (when possible) and getting the exposure of your subject close (which may mean blowing out the background). Fill flash can help, and HDR is sometimes an option if you are shooting a static scene -- but it doesn't work if you are trying to capture anything in motion.

Here is a shot from last weekend at Mackinac Island. I had an overly bright background. I moved my position as much as I could to still get a decent composition, increased my exposure to blow out the background, and then used Lightroom to increase shadows for the subject and reduce highlights for the background.

IMG_1402-X2.jpg


Sometimes you can also use Lightroom to adjust the saturation of certain colors which get blown out in a high dynamic scene. Here is another shot from Mackinac Island last weekend. I reduced saturation of green and yellow, and increased the shadow level.

IMG_1398-X2.jpg
 

JohnRice

Bounded In a Nutshell
Premium
Ambassador
HW Reviewer
Senior HTF Member
Joined
Jun 20, 2000
Messages
18,935
Location
A Mile High
Real Name
John
Mike, that carriage shot is a perfect example. You should post a "before", straight version for comparison, to show how much can be done.
 

Mike Frezon

Moderator
Premium
Senior HTF Member
Joined
Oct 9, 2001
Messages
60,773
Location
Rexford, NY
Thanks, fellas! That's impressive. The side-by-side really helps to clarify what you're talking about.

That display on the wall behind the carriage is amazing in how it appeared out of nowhere.

I don't have Lightroom. But I have PhotoShop. I'm assuming the same processes can be applied?

I've done this sort of thing before (using PhotoShop)...but I always find the selection tool to be a PITA. Trying to separate out that carriage would be way too much for me.

Or, does Lightroom have some sort of intuitive way about it which recognizes and distinguishes between subject and background. Who knows? Maybe PhotoShop has the same? I have CS 5 or 5.5 (circa 2011).
 

JohnRice

Bounded In a Nutshell
Premium
Ambassador
HW Reviewer
Senior HTF Member
Joined
Jun 20, 2000
Messages
18,935
Location
A Mile High
Real Name
John
You don't have to separate things. You HAVE to shoot RAW and you do most of this to the entire photo during the initial Camera RAW Conversion, before actually opening it in Photoshop.
 

Mike Frezon

Moderator
Premium
Senior HTF Member
Joined
Oct 9, 2001
Messages
60,773
Location
Rexford, NY
Oh. OK.

I have my camera currently set up to create jpegs when I shoot. I want to say each image is about 2+MB. I'm currently using a 64 GB SD card which indicated I would be able to take something like 6600+ images at my current settings. About how many would I expect if shooting RAW?

Hmmmm. Will I see a noticeable change in resolution if I switch to RAW?

I apologize for asking such basic questions.

I've always wanted to take a photo class...but most of them seem geared towards composition...and I really want to learn more about the mechanics of how the camera works, etc.
 

JohnRice

Bounded In a Nutshell
Premium
Ambassador
HW Reviewer
Senior HTF Member
Joined
Jun 20, 2000
Messages
18,935
Location
A Mile High
Real Name
John
There's technically no change in resolution between jpg and RAW, unless you set it to save less than full res jpgs. How big the RAW files are will depend on the MP of the camera, the bit depth (12 bit, 14 bit) and if and what kind of RAW compression it has. Ideally you want to save the greatest amount of info you can, which would be 14 bit, lossless compressed RAW. You can also use the AdobeRGB color space, but for most people the sRGB color space is just fine. Most monitors can't reproduce AdobeRGB anyway. Your wife's iMac probably can, since they added that in 2015, I think. On my D500 (20.9 MP), the files are about 24-25MB at 14 bit, AdobeRGB, lossless compressed.

Bottom line, to really do what Scott demonstrated, you have to save in the best RAW option available on your camera.

BTW, if you've only ever shot jpg, then you've never even seen the camera raw conversion step in Photoshop. It opens automatically when you open a raw file, and is a preliminary step before the image is actually opened in Photoshop.
 

Scott Merryfield

Senior HTF Member
Joined
Dec 16, 1998
Messages
18,892
Location
Mich. & S. Carolina
Real Name
Scott Merryfield
Just to add to John's statements, shooting in the highest quality RAW format is the key to being able to do what I accomplished above. You still will not be able to recover shots that are way too over or under exposed, but you will be surprised at what you can recover from most shots. I do all my processing in Lightroom, and it's really quite simple once you get the hang of it. The changes I made to the above photo only took a few seconds. I'm sure Photoshop works similarly during the initial RAW conversion, although it has a lot more features available for editing after conversion.

The RAW file of the above photo was about 23.5MB, and the jpeg that I processed from Lightroom ended up being about 13.7MB. This was from a Canon EOS M camera which has an 18MP APS-C crop sensor. File sizes will vary based on the camera sensor and lighting conditions - low light high ISO shots tend to create larger RAW files. My Canon 5D3 with its 22.3MP full frame sensor will usually generate RAW files anywhere from 25MB - 32MB, and I get similar file sizes from my Canon 7D2 with its 20MP APS-C sensor. I use 64GB cards with my 5D3 and 7D2, and have a 32GB card for the EOS M. I've never had an issue running out of space. Even when traveling for a week or more, I rarely need to change a full memory card.
 
Last edited:

Mike Frezon

Moderator
Premium
Senior HTF Member
Joined
Oct 9, 2001
Messages
60,773
Location
Rexford, NY
Again...thanks guys. Lots to unpack in all this. First thing I'll do is look at the camera settings and make the changes. And, yes, having never shot RAW, I've never seen the conversion step.

Although I'm not sure, John, why you think my wife has an iMac. :laugh: We're a PC-only family.
 

JohnRice

Bounded In a Nutshell
Premium
Ambassador
HW Reviewer
Senior HTF Member
Joined
Jun 20, 2000
Messages
18,935
Location
A Mile High
Real Name
John
It occurred to me after I posted, that I probably had you confused with another HTFer.
 

JohnRice

Bounded In a Nutshell
Premium
Ambassador
HW Reviewer
Senior HTF Member
Joined
Jun 20, 2000
Messages
18,935
Location
A Mile High
Real Name
John
Anyway, the basic concept is that any decent DSLR can capture about 10X as much data as is needed to create a good image. With RAW, you get to select what is used and how it's used. When you have the camera save only the jpg, it goes ahead and throws away the extra 90% that IT thinks isn't necessary. So, it's gone for good. When you save in RAW, you have every bit of data that came off the sensor, unless your camera only saves RAW with lossy compression, where it still discards some highlight info, from how I understand it. It's still worlds better than jpg.
 

Users who are viewing this thread

Sign up for our newsletter

and receive essential news, curated deals, and much more


You will only receive emails from us. We will never sell or distribute your email address to third party companies at any time.

Forum statistics

Threads
357,052
Messages
5,129,689
Members
144,281
Latest member
blitz
Recent bookmarks
0
Top